- Login into Mininet VM.
- $ sudo apt-get install unzip
- $ sudo
apt-get install g++
- $ wget
http://traffic.comics.unina.it/software/ITG/codice/D-ITG-2.8.1-r1023-src.zip
- $ unzip D-ITG-2.8.1-r1023-src.zip
- $ cd D-ITG-2.8.1-r1023/src
- $ make
Once
done, the binaries will be copied into the ”D-ITG-2.8.1-r2058M/bin” directory.
Demo Tutorial:
- Download and
install Xming X Server for Windows (http://sourceforge.net/projects/xming/).
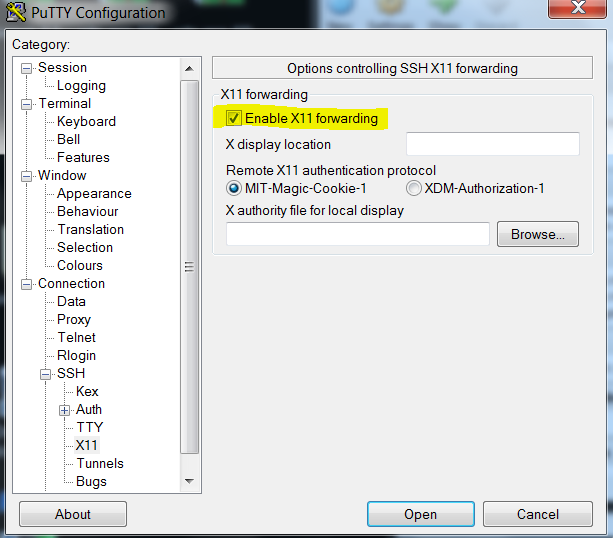
- Login into Mininet
VM via PuTTY with X11 forwarding
option selected.
- Login into Mininet
(this session is for controller setup).
- $ cd ~/pox
- $ ./pox.py
forwarding.l2_learning
- Now run these commands
into the first PuTTY session.
- $ cd ~
- $ sudo mn
--controller=remote,ip=127.0.0.1,port=6633
- $ xterm h1
- $ xterm h2
- Now in the
xterm window of h2, run these commands.
- $ cd
D-ITG-2.8.1-r1023/bin
- $ ./ITGRecv
- Now in the xterm of h1, run these commands.
- $ cd
D-ITG-2.8.1-r1023/bin
- $ ./ITGSend –T UDP –a 10.0.0.2 –c 100 –C 10 –t 15000 -l sender.log –x receiver.log
Now to analyze the logs, run these command.
Run this in the xterm of h1.
$ ./ITGDec sender.log
-
Similarly run this on h2.
References:
- mininet.org/walkthrough/
- traffic.comics.unina.it/software/ITG/manual/


